

Geohash & Firebase: A Spatial Combo
2023-02-13
9 min read
1625 words
Sup! Ever used Yik Yak or Whisper? They're pretty sweet 'cause they let you see posts from peeps near you. The best part is you can filter content by proximity, makin' it way easier to connect with locals.
In this post, we'll show you how to build a proximity chat feature with geohashes and Firebase. We'll start by settin' up a Firebase project and gettin' the services we need. Then, we'll integrate geohashing into our app for location-based filtering. Finally, we'll use Firestore to build the chat feature, so users can communicate in real-time based on their location.
By the end of this, you'll know how geo hashes work and how to add 'em to your app. This'll help you connect users with others in their area, just like Yik Yak or Whisper, makin' your app more engaging and interactive! Let's jump in.
Geohashing basics
Geohashing is a way of representing geographic coordinates using a short string of characters, and it's based on dividing the Earth into a grid of cells, where each cell is represented by a unique geohash.
One of the biggest advantages of geohashing is its ability to quickly and efficiently search for nearby locations. For example, Tinder uses geohashing to match users who are in the same geographic area. Instead of comparing the distances between each pair of coordinates, they compares their geohashes, which is a much faster process.
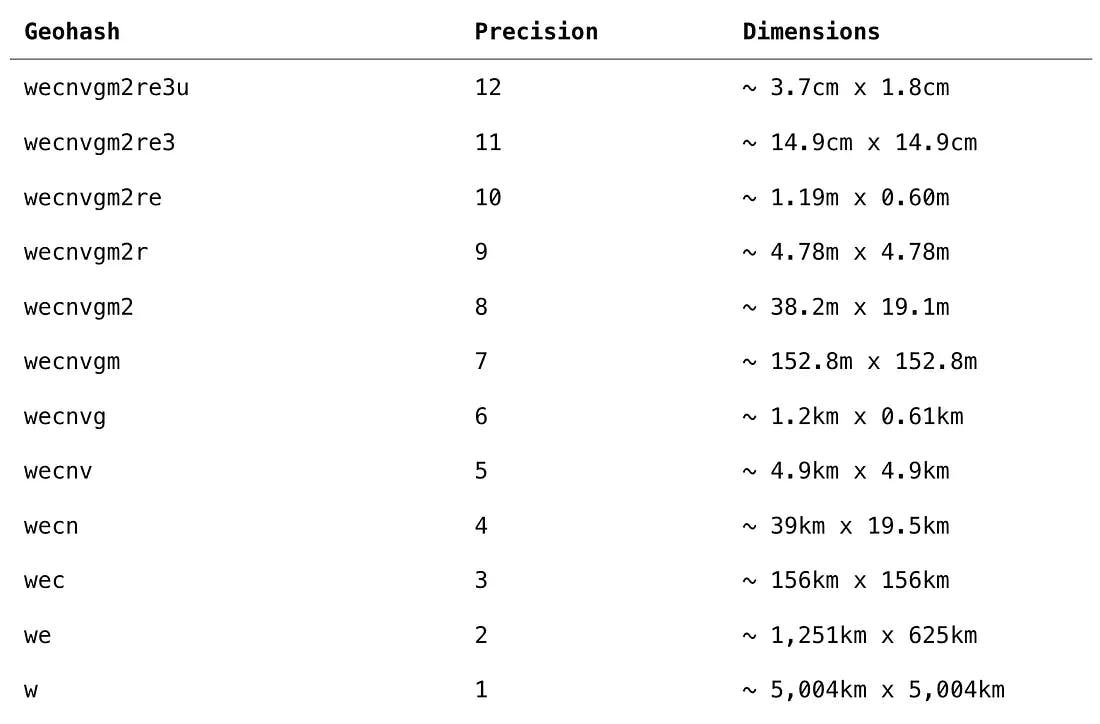
The precision of the geohash (i.e. the length of the geohash string) can also be adjusted based on our needs. For instance, Uber uses geohashing with a length of 6 to divide cities into regions, which helps with dispatching drivers to nearby ride requests. A geohash with a length of 6 characters represents a region that is approximately 1.22 km x 0.61 km. A shorter geohash (i.e. fewer characters) represents a larger area, while a longer geohash represents a more specific area. For example, if the latitude and longitude are 22.29818732, 114.16646970, it can have different length of geohash like the table below:

Geohashing is not only useful for efficient location-based searches, but it can also help provide a degree of anonymity for users. We don't necessarily need to expose the exact location of a user. Instead, only by calculating their certain length with latitude and longitude, we can know that the user is somewhere within a particular area without revealing their precise location. This can be helpful for privacy purposes, as some users may not want to share their exact location with others but still want to connect with people in their vicinity.
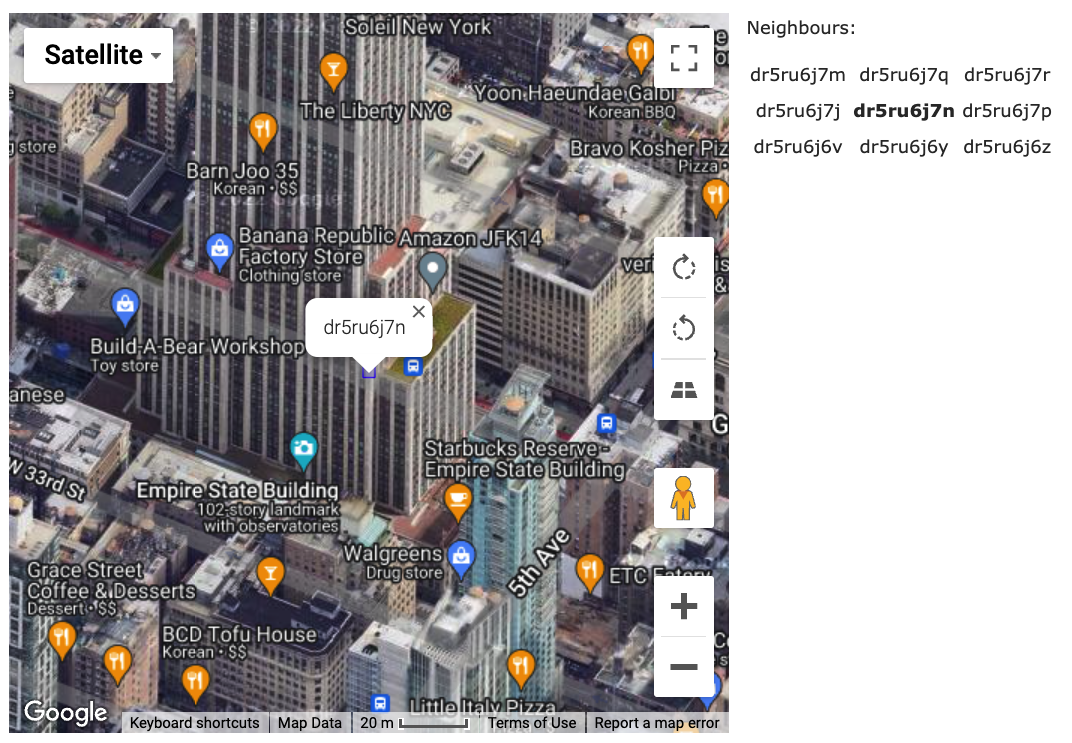
Let's take an example of a geohash, such as dr5ru6j7n. This represents the location of Empire State Building in New York, which has a precision of 9 characters and has a latitude and longitude of 40.748817 and -73.985428, respectively. Each character in a geohash represents a specific area of the world, with more characters indicating a more specific location. You can use geohash maps to experiment with different geohashes and see which locations they correspond to.
In the context of our proximity chat feature, we'll use geohashes to generate the uniqe key, which we can use as roomId to keep them under a specific chat room. Later we can use the geohash precision (the length of geohash) to define the area coverage. This technique is also used in apps like Yik Yak, which displays messages from users within a certain geographic area.
Let’s go deeper, if I want to talk with people within ~5km, I can go to the room with the geohash — dr5ru (~4.9km x 4.9km from above table). Then, all the people within this area can talk with each other. An example is the image below:

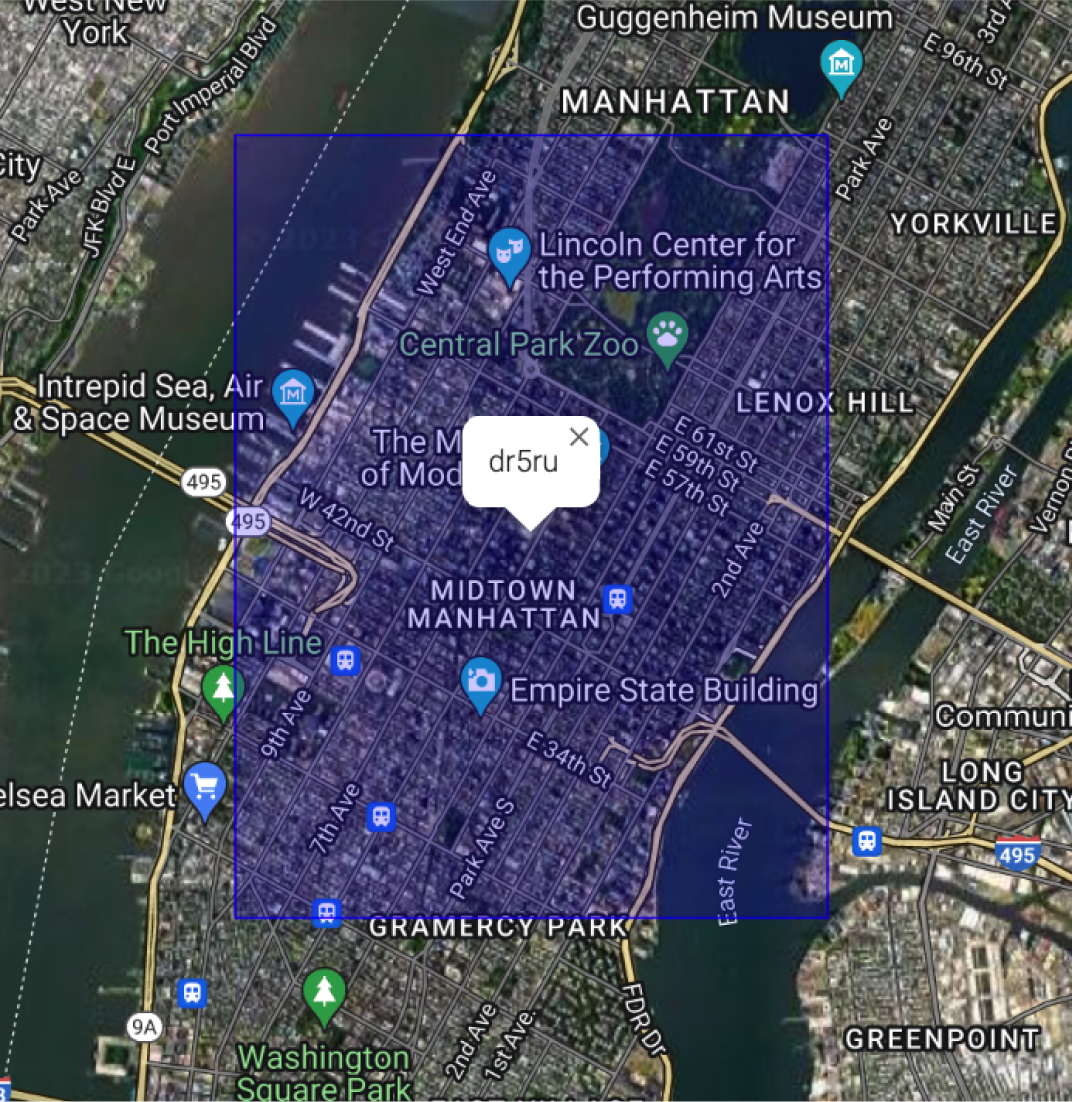
Above map is Midtown Manhatten in New York, the blue square is the geohash coverage with precision — 5 (~5km). The white icon represents my current location and the square around me is the room. Therefore, all the people including myself inside that blue square can talk with each others.
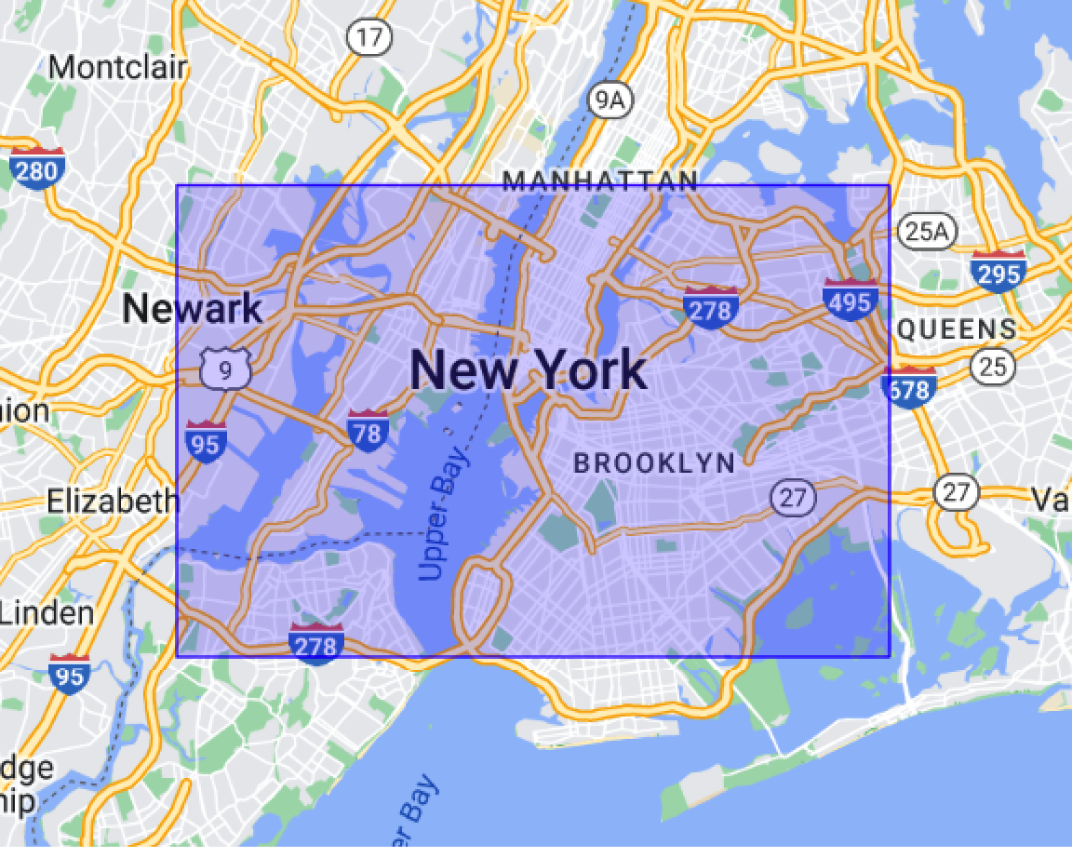
What will happen If I change the precision from 5 to 4 (i.e. dr5ru to dr5r)?. The area coverage will become bigger like the image below (The blue square already cover New York already):

Here's what all we have discussed would look like in code:
{
    Room: /rooms/{geohash} // let room id be any geohash i.e dr5ru
    Messages: /rooms/{geohash}/messages
}
Let room id be any geohash. As for the example of this Empire state building:
{
    Room: /rooms/dr5ru
    Messages: /rooms/dr5ru/messages
}
With the basics of geohashing and its advantages covered, let's move on to the next chapter where we'll set up our Firebase project and integrate geohashing into our app.
Bringing Firestore into the equation
At first let's configure firebase, install firebase into our app. We are gonna use the ngeohash package to generate the geohashes. Install them via the following command:
npm install ngeohash firebaseCopy and paste the credentials you get from your firebase account. Then call initializeApp with the required config.
import { initializeApp } from "firebase/app";
import {
  getFirestore,
  collection,
  addDoc,
  serverTimestamp,
  onSnapshot,
  query,
  orderBy,
} from "firebase/firestore";

const firebaseConfig = {
  apiKey: "",
  authDomain: "",
  projectId: "",
  storageBucket: "",
  messagingSenderId: "",
  appId: "",
  measurementId: "",
};

const app = initializeApp(firebaseConfig);
const db = getFirestore(app);
Add an util function to send messages called sendMessage under a specific room id. It should take these three params.
async function sendMessage(roomId: string, displayName: string, text: string) {
  try {
    await addDoc(collection(db, "chat-rooms", roomId, "messages"), {
      displayName: displayName,
      text: text.trim(),
      timestamp: serverTimestamp(),
    });
  } catch (error) {
    console.error(error);
  }
}
Similarly we write a function getMessages to fetch the messages via roomId. Passing a callback to get results after.
function getMessages(roomId: string, callback: (message: any) => void) {
  return onSnapshot(
    query(
      collection(db, "chat-rooms", roomId, "messages"),
      orderBy("timestamp", "asc")
    ),
    (querySnapshot) => {
      const messages = querySnapshot.docs.map((x) => ({
        id: x.id,
        ...x.data(),
      }));

      callback(messages);
    }
  );
}
So, bringing everything together this is what my firebase.ts looks like. Look I haven't exported app or db because this file is the single source of truth.
import { initializeApp } from "firebase/app";
import {
  getFirestore,
  collection,
  addDoc,
  serverTimestamp,
  onSnapshot,
  query,
  orderBy,
} from "firebase/firestore";

const firebaseConfig = {
  apiKey: "",
  authDomain: "",
  projectId: "",
  storageBucket: "",
  messagingSenderId: "",
  appId: "",
  measurementId: "",
};

const app = initializeApp(firebaseConfig);
const db = getFirestore(app);

async function sendMessage(roomId: string, displayName: string, text: string) {
  try {
    await addDoc(collection(db, "chat-rooms", roomId, "messages"), {
      displayName: displayName,
      text: text.trim(),
      timestamp: serverTimestamp(),
    });
  } catch (error) {
    console.error(error);
  }
}

function getMessages(roomId: string, callback: (message: any) => void) {
  return onSnapshot(
    query(
      collection(db, "chat-rooms", roomId, "messages"),
      orderBy("timestamp", "asc")
    ),
    (querySnapshot) => {
      const messages = querySnapshot.docs.map((x) => ({
        id: x.id,
        ...x.data(),
      }));

      callback(messages);
    }
  );
}

export { sendMessage, getMessages };
Optionally, we can create a hook to subscribe for messages in real time.
import React from "react";
import { getMessages } from "@/lib/firebase";

function useMessages(roomId: string) {
  const [messages, setMessages] = React.useState([]);

  React.useEffect(() => {
    const unsubscribe = getMessages(roomId, setMessages);

    return unsubscribe;
  }, [roomId]);

  return messages;
}

export { useMessages };
In the homepage of our application we will add an useEffect to ask user for location, and use that latitude and longitude to generate geohash at a precision level of 5.
const [userGeoHash, setUserGeoHash] = useState("");

useEffect(() => {
  navigator.geolocation.getCurrentPosition((position) => {
    const hash = geohash.encode(
      position.coords.latitude,
      position.coords.longitude,
      5 // precision
    );

    setUserGeoHash(hash);
  });
});
As we have everything we need we can call sendMessage function via the following code. Replace John Doe with a display of the user and replace Heyyy!!! with the message you want to emit.
sendMessage(userGeoHash, "John Doe", "Heyy!!!");And to fetch the messages we just needs user's geoHash.
const messages = useMessages(userGeoHash);Horrayy, we just created our own proximity chat app. 🎉
You can find the code of this in my github repo.
Ending Thoughts
Well folks, that brings us to the end of our blog post on geohashing and building a proximity chat app. I hope you found this post informative and helpful in understanding the basics of geohashing and how it can be applied in building location-based features in your apps.
Throughout this post, we've covered a lot of ground, from the fundamentals of geohashing and how it works, to the step-by-step process of integrating geohashing functionality into a chat app using Firebase.
We've also highlighted some of the advantages of geohashing, such as its ability to quickly and efficiently search for nearby locations and its customizable precision, which allows you to control the size of the cells and the level of detail.
While we focused on building a proximity chat app in this post, the possibilities for geohashing are endless. It can be applied to a wide range of use cases, from social media apps to ride-sharing apps, and even in tracking wildlife and weather patterns.
In conclusion, geohashing is a powerful tool that enables developers to build location-based features in their apps quickly and efficiently. By using geohashes to represent geographic coordinates, developers can search for nearby locations and group users based on their location, all while maintaining a level of privacy and anonymity.
Thank you for taking the time to read this post, and I hope you found it useful. As always, happy coding!